Building a WireGuard Jail with the FreeBSD's Standard Tools
Recently, I had an opportunity to build a WireGuard jail on a FreeBSD 12.1 host.
As it was really quick and easy to setup and it has been working completely fine for a month, I’d like to share my experience with anyone interested in this topic.
- I would like to use WireGuard app on my Android phone to access my home NAS (a vanilla FreeBSD server) via the WireGuard tunnel and reach the Internet through the tunnel too.
- The host is a small home gateway/firewall (PC Engines APU2) running FreeBSD 12.1/amd64 (GENERIC kernel) on ZFS.
- The host is routing/NATing traffic between two physical interfaces (igb1 and igb0), each of which is connected to the home LAN and the Internet respectively.
- The host’s public IP address (on igb0) is dynamically assigned by my ISP. I’m using Amazon Route53 to add a FQDN for the address (“wg.example.com”) and automatically update its address with dhcpclient-exit-hooks.
- The host is also acting as a DNS/DHCP server (dnsmasq) for the home LAN.
- WireGuard will be installed in a VNET jail (named “wg”) created on the host.
(I have setup WireGuard on a FreeBSD host (not in a jail) before. See this article for that.) - The WireGuard jail will be placed in an internal network and the host will route/NAT traffic from/to the jail.
- The internal network will be created with a bridge and epairs.
Although I’m quite a fan of netgraph and usually use ng_eiface/ng_bridge for VNET jails, this time I’ll try another more popular option. - Only the standard tools in the FreeBSD base system will be used to manage the jail and the internal network.
This is also one of the reasons I use bridge/epair this time instead of netgraph, for which I always use my script to setup network.
I have achieved my goal by roughly taking the following steps.
Create a Jail Filesystem
As usual, I created a jail’s filesystem from a template ZFS snapshot.
$ sudo sh -c "zfs send zroot/vm/tmpl/12.1@p3 | zfs receive zroot/vm/wg"
Refer to this article for details on how to create a template.
Configure Internal Network
I created a bridge (bridge0) for the internal jail network (192.168.20.0/24) and an epair (epair0a/b), attached the ‘b’ side of the epair to the bridge and assigned an IP address to the bridge.
Adding the IP address to the bridge0 makes it the third routed interface on the host and the address becomes the default gateway for the jail.
[/etc/rc.conf]
cloned_interfaces="bridge0 epair0"
ifconfig_bridge0="inet 192.168.20.1/24 addm epair0b up"
ifconfig_epair0b="up"

In the above example, I use the bridge so that I can add more jails to the internal subnet in the future, as shown in the following diagram.
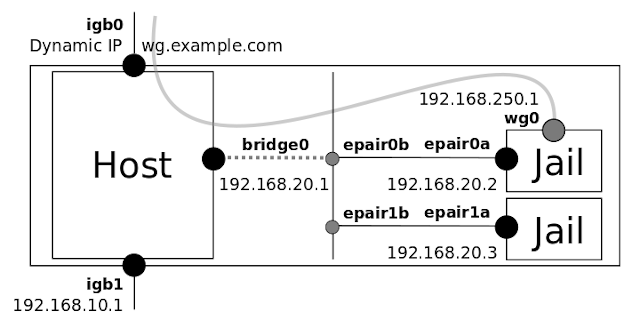
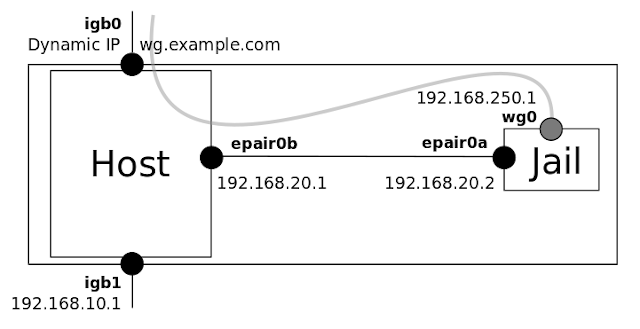
But if you need only a single jail, it’s not necessary to use the bridge.
You can connect the jail to the host directly with the epair by using the following configuration.
With this config, epair0b becomes the host’s third routed interface.
[/etc/rc.conf]
cloned_interfaces="epair0"
ifconfig_epair0b="inet 192.168.20.1/24"
Adjust Firewall Rules
Next I edited /etc/pf.conf to adjust firewall rules for the jail and WireGuard subnets.
-
Define macros for the internal jail and WireGuard subnets, the WireGuard jail’s address and the WireGuard port.
> jailnet = "192.168.20.0/24" > wgnet = "192.168.250.0/24" > wg_ipv4 = "192.168.20.2" > wg_port = "51820" -
Add outgoing packets from the jail and the WireGuard subnet to the NAT target.
< nat on $ext_if inet from $localnet to any -> ($ext_if) --- > nat on $ext_if inet from { $localnet $jailnet $wgnet } to any -> ($ext_if) -
Add a rdr (port-forwarding) rule to redirect incoming UDP packets destined to the port 51820 of the host’s public IP address to the jail.
> rdr pass log on { $ext_if $int_if } inet proto udp to ($ext_if) port $wg_port -> $wg_ipv4 -
Allow incoming packets from the jail and the WireGuard subnet.
> pass in from { $jailnet $wgnet }
Configure the Jail
On the Host
-
Edit or create /etc/devfs.rules to add a devfs ruleset for the jail. This is required for the jail to create WireGuard interfaces.
[devfsrules_bpfjail=10] add include $devfsrules_jail add path 'bpf*' unhide -
Edit or create /etc/jail.conf to add basic configurations for the WireGuard jail “wg”.
exec.start = "/bin/sh /etc/rc"; exec.stop = "/bin/sh /etc/rc.shutdown"; exec.clean; mount.devfs; host.hostname = $name; path = "/vm/$name"; exec.consolelog = "/var/log/jail_${name}_console.log"; wg { $vif = "epair0a"; $route = "192.168.250.0/24 192.168.20.2"; vnet; vnet.interface = $vif; exec.prestart += "route add $route"; exec.poststop += "route delete $route"; # workaround # https://bugs.freebsd.org/bugzilla/show_bug.cgi?id=238326 exec.prestop += "ifconfig $vif -vnet $name"; allow.chflags; devfs_ruleset = 10; } -
Edit /etc/rc.conf to enable the jail on system startup.
jail_enable="YES"
jail_list="wg"
On the Jail’s Filesystem
- Pre-edit the jail’s /etc/rc.conf (/vm/wg/etc/rc.conf on the host) to configure its IP address/default gateway address and enable packet forwarding (router) function.
ifconfig_epair0a="192.168.20.2/24"
defaultrouter="192.168.20.1"
gateway_enable="YES"
Apply Configurations and Start the Jail
Once the jail configurations on the host and the jail’s filesystem were finished, I ran the following commands to actually build the internal network, reload the firewall rules and start the jail.
$ sudo service netif cloneup
$ sudo service pf reload
$ sudo service jail start
Install and Configure WireGuard
On the Jail
Next I used pkg’s -j option to install WireGuard and libqrencode on the jail. The latter will be used for generating a QR code to pass WireGuard configuration to Android device.
$ sudo pkg -j wg install wireguard libqrencode
Then, finally I logged in to the jail and configured WireGuard. See this article for more details.
$ sudo jexec -l wg
<root@wg># cd /usr/local/etc/wireguard/
<root@wg># wg genkey | tee wg.private | wg pubkey > wg.public
<root@wg># wg genkey | tee android.private | wg pubkey > android.public
<root@wg># vi wg0.conf
<root@wg># chmod 400 *.private *.conf
<root@wg># sysrc wireguard_enable="YES"
<root@wg># sysrc wireguard_interfaces="wg0"
[wg0.conf]
[Interface]
Address = 192.168.250.1/32
PrivateKey = <content of wg.private>
ListenPort = 51820

[Peer]
PublicKey = <content of android.public>
AllowedIPs = 192.168.250.2/32
[android.conf]
[Interface]
Address = 192.168.250.2/32
PrivateKey = <content of android.private>
DNS = 192.168.10.1

[Peer]
PublicKey = <content of wg.public>
AllowedIPs = 0.0.0.0/0,::/0
Endpoint = wg.example.com:51820
On the Android Device
Install WireGuard App from Google Play.
https://play.google.com/store/apps/details?id=com.wireguard.android
Then configure Android app using a QR code generated by qrencode. See this article for more details.
<root@wg># qrencode -t ansi < android.conf
References
-
WireGuard
https://www.wireguard.com/ -
genneko: Learning Notes on FreeBSD Jails
https://genneko.github.io/playing-with-bsd/system/learning-notes-on-jails/ -
genneko: WireGuard on FreeBSD Quick Look Part 2: Android Remote Access
https://genneko.github.io/playing-with-bsd/networking/freebsd-wireguard-android/
Revision History
- 2020-04-26: Created