Understanding VLAN Configuration on FreeBSD
Until recently, I’ve never had a chance to use VLANs on FreeBSD hosts, though I sometimes configure them on ethernet switches.
But when I was playing with vnet jails, I suddenly got interested in VLAN configuration on FreeBSD and experimented with it for some time.
I wrote this short article to summarize my current understanding of how to configure VLANs on FreeBSD.
Terminology
I think the word VLAN is being used in at least two different senses.
In a narrow sense, it stands for IEEE 802.Q vlan tagging.
On FreeBSD, it’s implemented as vlan(4) logical interface (sub-interface).
In a broader sense, the word VLAN is used to describe a layer 2 network which is physically or logically created in a wider network. On a single ethernet switch, a VLAN can be regarded as a virtual switch with a selected subset of its ethernet ports. On FreeBSD, it can be represented by bridge(4).
In this article, I use the word in the latter sense. Thus, the words VLAN and bridge are interchangeable in most cases.
For the VLAN in a narrow sense, I use “tagged or trunk ports (interfaces)”.
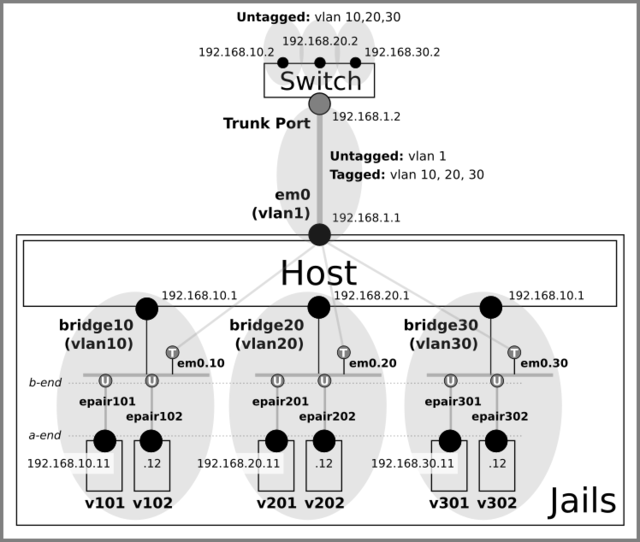
Target Topology
I set my goal here to create the following network topology with a ethernet switch, a FreeBSD host and vnet jails on it.
The switch has the layer3 capability and acts a router on this network. Later, I will also try to have the host forward IP traffic between VLANs.
As I’m not a network engineer (nor an engineer of any kind), there might be something which makes no sense in real network. But anyway I’m going for it.
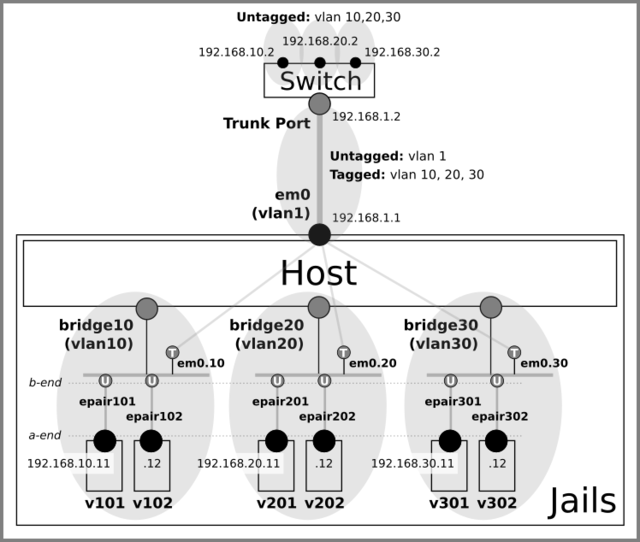
Here are some notes and assumptions.
-
There are four VLANs and corresponding IP subnets on this network.
(vlan 1, 10, 20, 30 and subnet 192.168.1.0/24, 192.168.10.0/24, 192.168.20.0/24, 192.168.30.0/24)-
Vlan 1 (192.168.1.0/24) is only used on the link between the host and the switch and all traffic on the VLAN is untagged.
-
Vlan 10, 20 and 30 are distributed across the network. They exist physically on the switch ports and virtually inside the host as the bridged jail networks.
Both parts of those VLANs are connected by a trunk (tagged) link between the host and the switch, which delivers 802.1Q tagged packets containing VLAN ID 10, 20 or 30 in addition to untagged (native) vlan 1 traffic.
-
-
Traffic between different subnets is always going through the switch, which is the only router on the network.
The gateway addresses for the VLANs are:- vlan 1 - 192.168.1.2
- vlan 10 - 192.168.10.2
- vlan 20 - 192.168.20.2
- vlan 30 - 192.168.30.2
-
The host has only a single IP address (192.168.1.1) on em0.
It cannot reach the jails directly because it doesn’t have any address in the jail’s subnet.
Instead, the host communicates with the jails via the switch (the host’s default gateway 192.168.1.2). -
Each vnet jail is connected to the corresponding bridge with epair(4).
As an epair has ‘a’ and ‘b’ ends (e.g. epair0a and epair0b), I decided to attach ‘b’ ends (‘b’ for ‘bridge’) to bridges and ‘a’ ends to jails.
TL;DR
In short, I could achieve the goal by adding the following lines in the standard configuration files.
/etc/rc.conf
The host’s part of the VLANs can be configured in this way.
#
# Create
#   3 bridges (VLANs)
#   6 epairs
#   3 802.1Q VLAN interfaces
#
cloned_interfaces="bridge10 bridge20 bridge30 epair101 epair102 epair201 epair202 epair301 epair302 em0.10 em0.20 em0.30"

#
# Assign an IP address to the host's untagged (native) interface.
# Point the default gateway to the switch's vlan 1 address.
#
ifconfig_em0="192.168.1.1/24"
defaultrouter="192.168.1.2"

#
# Bring up all interfaces to be added to the bridges.
# 'a' sides of the epairs (epairXa) will be up when they are assigned
# IP addresses in the jails.
#
ifconfig_em0_10="up"
ifconfig_em0_20="up"
ifconfig_em0_30="up"
ifconfig_epair101b="up"
ifconfig_epair102b="up"
ifconfig_epair201b="up"
ifconfig_epair202b="up"
ifconfig_epair301b="up"
ifconfig_epair302b="up"

#
# Add tagged(em0.x) and untagged(epairXb's) members to the bridges.
#
ifconfig_bridge10="addm em0.10 addm epair101b addm epair102b up"
ifconfig_bridge20="addm em0.20 addm epair201b addm epair202b up"
ifconfig_bridge30="addm em0.30 addm epair301b addm epair302b up"
/etc/jail.conf
Each jail is given the ‘a’-end of the corresponding epair by ‘vnet.interface’.
For brevity, I use ‘exec.start’ here to assign IP and gateway addresses to the jails, but it might be more common to do this in each jail’s /etc/rc.conf.
exec.start = "/bin/sh /etc/rc";
exec.stop = "/bin/sh /etc/rc.shutdown";
exec.clean;
mount.devfs;

host.hostname = $name;
path = "/vm/$name";
exec.consolelog = "/var/log/jail_${name}_console.log";

vnet;
vnet.interface = $vif;

exec.start += "ifconfig $vif $addr";
exec.start += "route add default $gw";

# workaround
# https://bugs.freebsd.org/bugzilla/show_bug.cgi?id=238326
exec.prestop += "ifconfig $vif -vnet $name";

v101 { $vif = "epair101a"; $addr = "192.168.10.11/24"; $gw = "192.168.10.2"; }
v102 { $vif = "epair102a"; $addr = "192.168.10.12/24"; $gw = "192.168.10.2"; }
v201 { $vif = "epair201a"; $addr = "192.168.20.11/24"; $gw = "192.168.20.2"; }
v202 { $vif = "epair202a"; $addr = "192.168.20.12/24"; $gw = "192.168.20.2"; }
v301 { $vif = "epair301a"; $addr = "192.168.30.11/24"; $gw = "192.168.30.2"; }
v302 { $vif = "epair302a"; $addr = "192.168.30.12/24"; $gw = "192.168.30.2"; }
Switch
This is a pseudo-config of an imaginary switch.
vlan 10
vlan 20
vlan 30

interface port 1
 switchport mode trunk
 switchport trunk allowed vlan 10,20,30

interface range port 2 - 4
 switchport mode access
 switchport access vlan 10

interface range port 5 - 7
 switchport mode access
 switchport access vlan 20

interface range port 8 - 10
 switchport mode access
 switchport access vlan 30

interface vlan 1
 ip address 192.168.1.2/24

interface vlan 10
 ip address 192.168.10.2/24

interface vlan 20
 ip address 192.168.20.2/24

interface vlan 30
 ip address 192.168.30.2/24
That’s it!
Surprisingly, the amount of required configuration is much less than I expected.
Learn by Manual Configuration
Next, I’m trying to explain each step of the VLAN configuration.
Manual configuration becomes somewhat lengthy but it will show you how FreeBSD constructs VLANs.
-
Let’s start with the following configuration.
The host has only the em0 configured while the switch has all VLANs and IP addresses properly setup.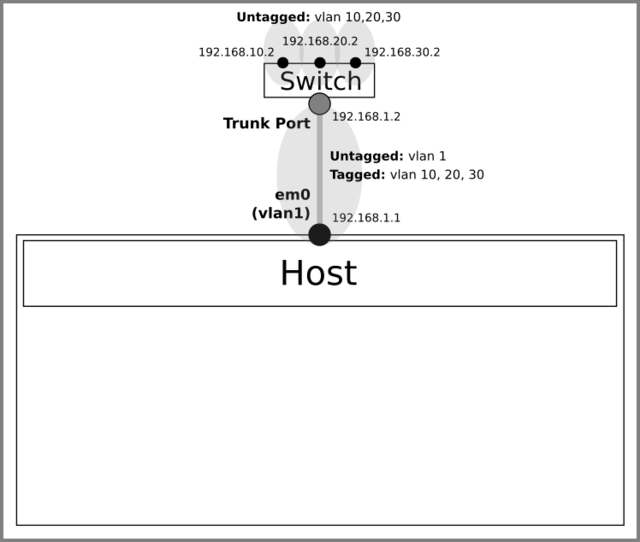
-
Create three bridges on the host, each of which forms a separate VLAN.
ifconfig bridge10 create
ifconfig bridge20 create
ifconfig bridge30 create
-
Create 802.1Q logical interfaces for vlan 10, 20 and 30 on the parent interface (em0) and add them to the bridges (VLANs).
Those logical interfaces become trunk (tagged) ports on the bridges.ifconfig em0.10 create ifconfig em0.20 create ifconfig em0.30 create ifconfig em0.10 up ifconfig em0.20 up ifconfig em0.30 up ifconfig bridge10 addm em0.10 up ifconfig bridge20 addm em0.20 up ifconfig bridge30 addm em0.30 up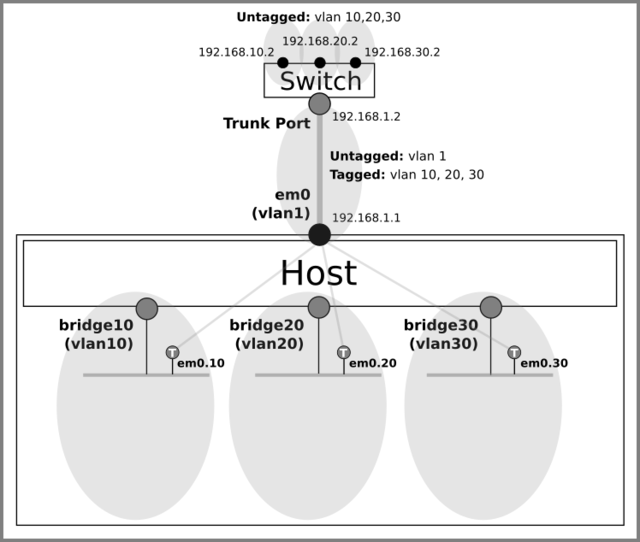
-
Create virtual interfaces (epairs) for the jails and add ‘b’ ends of them to the bridges (VLANs) as access (untagged) ports.
ifconfig epair101 create
ifconfig epair102 create
ifconfig epair201 create
ifconfig epair202 create
ifconfig epair301 create
ifconfig epair302 create
ifconfig epair101b up
ifconfig epair102b up
ifconfig epair201b up
ifconfig epair202b up
ifconfig epair301b up
ifconfig epair302b up
ifconfig bridge10 addm epair101b addm epair102b
ifconfig bridge20 addm epair201b addm epair202b
ifconfig bridge30 addm epair301b addm epair302b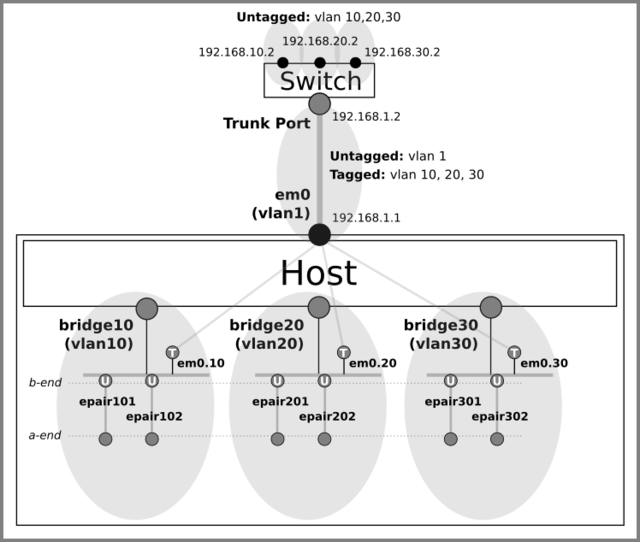
-
Create the vnet jails and move ‘a’ ends of the epairs from the host to the jails.
See jail(8) for the command to manually creating/destroying jails.jail -c name=v101 vnet persist jail -c name=v102 vnet persist jail -c name=v201 vnet persist jail -c name=v202 vnet persist jail -c name=v301 vnet persist jail -c name=v302 vnet persist ifconfig epair101a vnet v101 ifconfig epair102a vnet v102 ifconfig epair201a vnet v201 ifconfig epair202a vnet v202 ifconfig epair301a vnet v301 ifconfig epair302a vnet v302
-
Assign IP addresses to the epairs on jails.
jexec v101 ifconfig epair101a 192.168.10.11/24 jexec v102 ifconfig epair102a 192.168.10.12/24 jexec v201 ifconfig epair201a 192.168.20.11/24 jexec v202 ifconfig epair202a 192.168.20.12/24 jexec v301 ifconfig epair301a 192.168.30.11/24 jexec v302 ifconfig epair302a 192.168.30.12/24 -
Done!
Additional Topics
Allow the Host to Access the Jails Directly
To let the host directly access the jails, assign an IP address to each bridge interface.
This can be done by adding inet 192.168.xx.1/24 to the following lines in the host’s /etc/rc.conf.
ifconfig_bridge10="inet 192.168.10.1/24 addm em0.10 addm epair101b addm epair102b up"
ifconfig_bridge20="inet 192.168.20.1/24 addm em0.20 addm epair201b addm epair202b up"
ifconfig_bridge30="inet 192.168.30.1/24 addm em0.30 addm epair301b addm epair302b up"
You can also do it manually.
ifconfig bridge10 inet 192.168.10.1/24
ifconfig bridge20 inet 192.168.20.1/24
ifconfig bridge30 inet 192.168.30.1/24
Let the Host Route Traffic Between Jail VLANs
At this point, the jails in different VLANs (subnets) can communicate each other but their packets still have to go through the switch.
You can avoid the packets leaving the host by enabling the IP forwarding on the host and making it act as a router.
After assigning IP addresses to the bridges, add the following line to the host’s /etc/rc.conf.
gateway_enable="YES"
To manually enable the IP forwarding, use the following commands.
sysctl net.inet.ip.fowarding=1
NOTE: To route packets between the bridges (VLANs), make sure to assign IP addresses to the bridges as described in the previous section, not their member interfaces such as em0.10.
You also have to change the default gateway for each jail from the switch’s vlan address to the host’s bridge interface address.
v101 { $vif = "epair101a"; $addr = "192.168.10.11/24"; $gw = "192.168.10.1"; }
v102 { $vif = "epair102a"; $addr = "192.168.10.12/24"; $gw = "192.168.10.1"; }
v201 { $vif = "epair201a"; $addr = "192.168.20.11/24"; $gw = "192.168.20.1"; }
v202 { $vif = "epair202a"; $addr = "192.168.20.12/24"; $gw = "192.168.20.1"; }
v301 { $vif = "epair301a"; $addr = "192.168.30.11/24"; $gw = "192.168.30.1"; }
v302 { $vif = "epair302a"; $addr = "192.168.30.12/24"; $gw = "192.168.30.1"; }
To change them dynamically, run the following commands.
jexec v101 route delete default 192.168.10.2
jexec v101 route add default 192.168.10.1
jexec v102 route delete default 192.168.10.2
jexec v102 route add default 192.168.10.1
jexec v201 route delete default 192.168.20.2
jexec v201 route add default 192.168.20.1
jexec v202 route delete default 192.168.20.2
jexec v202 route add default 192.168.20.1
jexec v301 route delete default 192.168.30.2
jexec v301 route add default 192.168.30.1
jexec v302 route delete default 192.168.30.2
jexec v302 route add default 192.168.30.1
Do not bridge the parent interface of the VLANs
When you use 802.1Q VLAN tagged interfaces created on a physical interface (parent interface), make sure not to add the parent interface to any bridge.
If you do this, ARP resolutions on the tagged interfaces seem to cease working as reported in the following PR/Forum Threads.
- Bug 240106 - VNET issue with ARP and routing sockets in jails
- FreeBSD Forum: VNET ARP replies are lost
- FreeBSD Forum: Bridge/epair not passing through tagged VLAN traffic between host and VNET jail
Use Another FreeBSD Host to Emulate the Switch
If you don’t have a switch at hand, you can setup another FreeBSD host to emulate it for the testing purpose.
A minimal configuration for the second host to act like a simple layer 3 switch (or more exactly a router capable of handling VLAN tags).
cloned_interfaces="em0.10 em0.20 em0.30"
ifconfig_em0="192.168.1.2/24"
ifconfig_em0_10="inet 192.168.10.2/24"
ifconfig_em0_20="inet 192.168.20.2/24"
ifconfig_em0_30="inet 192.168.30.2/24"
gateway_enable="YES"
If the host has multiple physical interfaces, it can be more like a switch.
cloned_interfaces="bridge10 bridge20 bridge30 em0.10 em0.20 em0.30"
ifconfig_em0="192.168.1.2/24"
ifconfig_em0_10="up"
ifconfig_em0_20="up"
ifconfig_em0_30="up"
ifconfig_em1="up"
ifconfig_em2="up"
ifconfig_em3="up"
ifconfig_bridge10="inet 192.168.10.2/24 addm em0.10 addm em1 up"
ifconfig_bridge20="inet 192.168.20.2/24 addm em0.20 addm em2 up"
ifconfig_bridge30="inet 192.168.30.2/24 addm em0.30 addm em3 up"
gateway_enable="YES"
References
-
FreeBSD Handbook: VLANs
https://www.freebsd.org/doc/handbook/network-vlan.html -
genneko: Learning Notes on FreeBSD Jails
https://genneko.github.io/playing-with-bsd/system/learning-notes-on-jails/
Revision History
- 2020-04-29: Created