Testing Joplin (Terminal and Desktop) and Web Clipper on FreeBSD
TL;DR (2020-01-15)
This article describes my initial exploration of Joplin in June 2019. It’s not intended to be a tutorial/howto and it’s not necessarily up to date.
Please refer to the newer post for more up-to-date and concise description on how to use Joplin on FreeBSD.
I’ve been using Evernote since April 2011.
Although there were times the app got disappointing updates or the service was unexpectedly interrupted (or more often expectedly interrupted by regular maintenance), it had been a great app/service and hopefully it is and it will be.
Looking at the sorted note list on its web application, I found my first note had a date of 2011-04-24 and it was about Android browser’s local file handling. That was exactly when I bought my first smartphone and played with Android 2.x on it, I remember.
Since then, the number of notes has grown up to around 20000 and without doubt, it had been one of the most frequently used applications along with web browsers, email clients and UNIX tools such as shells, ssh, rsync and vim … until last week.
There might be something wrong with the recent update of Android app. It suddenly became draggingly slow and began draining battery all the time. My phone got unusually hot, so I had no other choice than to uninstall it and start looking for alternatives.
To be clear, the app for Windows and Web continue to work fine.
But as my daily usecase of Evernote is as follows along with the fact that “Evernote for Web” cannot be used on Android browsers, I effectively lost access to my notes on mobile environments. That’s a really huge problem.
-
On PCs
- using “Evernote for Web” to view/add/edit (usually long) notes and clip web pages
I only use “Evernote for Windows” for sync and export notes to the local drive.
- using “Evernote for Web” to view/add/edit (usually long) notes and clip web pages
-
On mobile devices
- using “Evernote for Android” to view and occasionally add/edit (usually short) notes and clip web pages
That is where Joplin comes in.
It’s an open source note-taking application which supports multiple platforms and it has been drawing my interest for a while (according to my note I first heard about it on December 2017).
While an update is still not available for Evernote Android app, I decided to try out Joplin on Android, Windows, Linux … and FreeBSD, my favorite operating system.
As this blog title has ‘BSD’, I will focus on installing Joplin on FreeBSD environments in thie article.
I’m not going to explain how to configure hosts, apps and a sync target (WebDAV server in my case) here.
They may or may not be in another article.
Which Types of Applications to Use?
According to the Joplin website, three types of applications are available and each one supports the following platforms.
- Desktop (Electron) Application - runs on Windows, MacOS and Linux.
- Mobile (React Native) Application - runs on Android and iOS.
- Terminal (Node.js) Application - runs on Windows, MacOS and Linux
(Actually, FreeBSD was added while I’m writing this article!)
At first glance, none of them seem to support FreeBSD.
Building the Electron-based desktop app on FreeBSD looks very hard to me, though I recently heard about the progress of Electron on FreeBSD.
2019-06-23: I added a new section on running the desktop app on FreeBSD!
On the other hand, the terminal app seems to have at least minimal support for FreeBSD as the issue #867 indicates, so I decided to start with the terminal app.
There are also the following add-on and third-party tools.
- Web Clipper Browser Extension - for Chrome and Firefox. use the desktop app’s Web Clipper API service
- joplin-web - Python-based web frontend. use the desktop app’s Web Clipper API service
- perl-Joplin-API - Perl module to access Web Clipper API
Basically all of them require the desktop app running on the same host because they interact with the API service provided by the desktop app.
But it seems possible to use the terminal app instead if it’s build with experimental support code. So I will try them later, too.
Install Terminal Application on FreeBSD
Okay, let’s install the terminal app on FreeBSD.
There’s two ways to install the app.
One is to install it with npm (Node Package Manager) and the other is to build it from its source code.
For each method, I describe the steps taken to install and run the terminal app on FreeBSD 11.2, 11.3-BETA3 and 12.0 (amd64 architecture).
Some Notes
-
Here I assume that ‘sudo’ is used to perform privileged operations and basic packages such as bash, rsync, python, curl and gnupg are already installed. If not, they can be installed by running something like
pkg install bash rsync python curl gnupg. -
If errors like ‘python: not found’ occur during an installation process even if python2.7 or python3.6 is installed, installing ‘python’ package may fix it.
-
While I mainly use node8 and npm-node8 packages, I confirmed that node10 and npm-node10 packages also work.
-
Some shell scripts (e.g. build.sh) that come with Joplin source code have a hard-coded path /bin/bash on SheBang line, but FreeBSD’s bash is installed in /usr/local/bin. So I run them like
bash ./build.sh.
Install the App using npm
This is the easiest way to install and run the plain Joplin terminal application.
Basically, I just have to follow the instructions in “Terminal application” / “Linux or Windows (via WSL)” section on the Joplin website.
-
Install dependencies.
pkgconf and vips are required for installing node-gyp.sudo pkg install node8 npm-node8 pkgconf vips sudo npm install -g node-gyp -
Install joplin terminal application.
NPM_CONFIG_PREFIX=~/.joplin-bin npm install -g joplin sudo ln -s ~/.joplin-bin/bin/joplin /usr/local/bin/joplin -
Start the terminal app by running the following command.
joplin -
Yeah. I got it working!
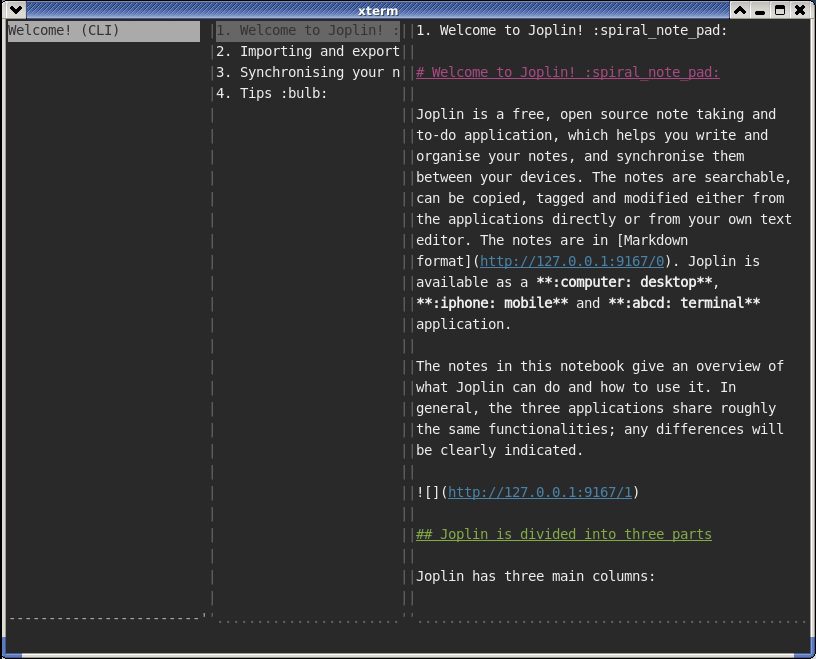
Now synchronization and other options can be setup with the built-in :config command (it’s like vi’s colon commands).
For example, use the following commands on the terminal app to setup synchronization to a WebDAV folder.:config sync.target 6 :config sync.6.path https://davserver.example.com/some/dav/folder :config sync.6.username dav_username :config sync.6.password dav_passwordWhat’s great about the terminal app is that those commands can be also run on a shell prompt like:
joplin config sync.target 6
joplin config sync.6.path https://davserver.example.com/some/dav/folder
joplin config sync.6.username dav_username
joplin config sync.6.password dav_password
For more information, please refer to Terminal Application Documentation.
Just one more thing.
:exitis the command to quit the app.
I remember the days I struggled to exit UNIX editors such as vi, emacs, joe and so on :)
Build the App from Source
If you want to modify or use experimental branch of the terminal application, this is the way to go.
Basically, you can follow the steps described in “Linux and Windows (WSL) dependencies”, “Building the tools” and “Building the Terminal application” sections on the Build instruction page.
-
Install dependencies.
pkgconf and vips are required for installing node-gyp.
Joplin website says that Yarn is also required but it doesn’t seem to apply to the terminal app.sudo pkg install node8 npm-node8 pkgconf vips sudo npm install -g node-gyp -
Get (clone) the source from GitHub.
cd ~/tmp/or/somewhere git clone https://github.com/laurent22/joplin.git -
Build the tools.
cd joplin/Tools npm install -
Build the terminal application (aka CLI client).
cd ../CliClient npm install bash ./build.sh rsync --delete -aP ../ReactNativeClient/locales/ build/locales/ sudo ln -s $(pwd)/build/main.js /usr/local/bin/joplin -
Start the terminal app by running the following command.
joplin
Please refer to Terminal Application Documentation for more information.
Web Clipper
Joplin Web Clipper is a web browser extension to clip web pages, just like Evernote Web Clipper.
It’s easy to install it on supported browsers, i.e. Chrome and Firefox. Just search “Joplin Web Clipper” on Chrome Web Store or Firefox’s Add-ons Manager page and add it to the browser.
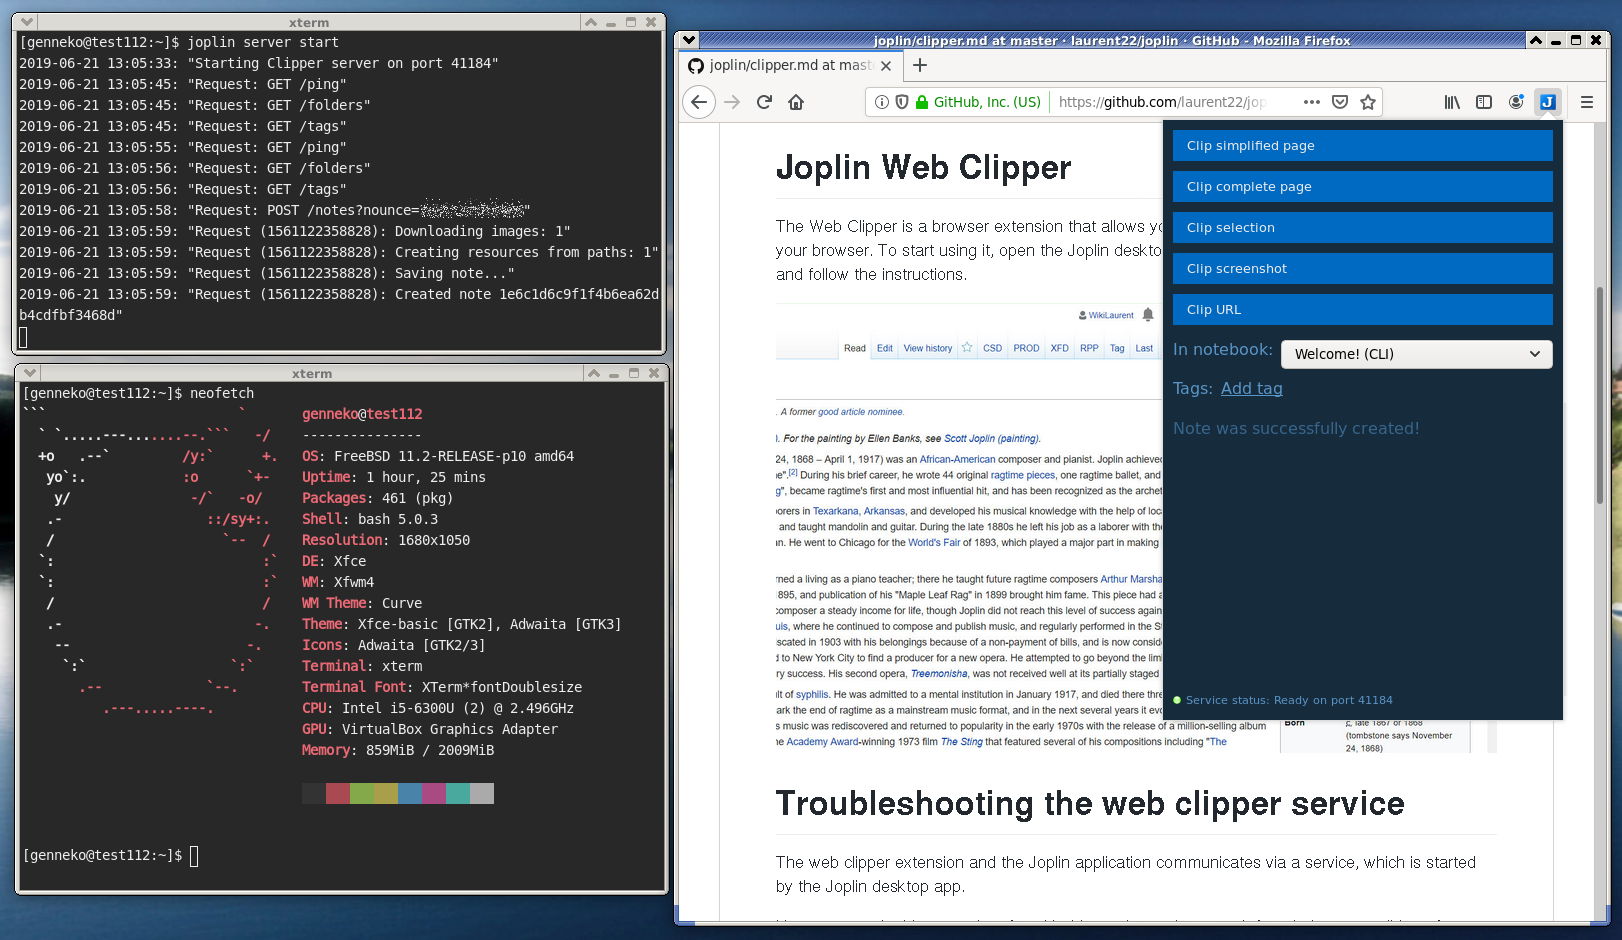
Whenever you want to clip(save) a web page you are currently visiting, just click “J” icon, select how/what/where to clip and click “Confirm”.
But on FreeBSD you may get an error like “Could not find clipper service”.
As I mentioned earlier, Web Clipper API service must be running on the same host as the browser. But the service can be only provided by the desktop application, which I cannot build on FreeBSD (yet). So what can I do?
Fortunately, there was already a discussion on Joplin Forum about implementing API service on the terminal app and there is also an experimental ‘headless-server’ branch in the repository.
That information made me try to build the terminal app with API server functionality.
Build the Terminal App with Headless Support
This is really a quick and dirty solution just for me and I will never recommend it to anyone else.
But anyway, I wanted to use Web Clipper on FreeBSD (and I also want to use Joplin behind a HTTP proxy) so I forked Joplin repo on GitHub and created a personal branch ‘headless_proxy’ from master, where I merged upstream’s headless-server and proxy_test branches with some dirty modifications to avoid a few issues I encountered.
Installation steps are exactly the same as Build the Terminal App from Source except the github repository to clone and the branch to use.
So please refer to the section and replace the step 2 with the following command lines.
git clone https://github.com/genneko/joplin.git
cd joplin
git checkout headless_proxy
This custom terminal app can be run the same as the original one.
To start Web Clipper API service, type the following command in the terminal app.
:server start
To stop the service, run the following command in the app or exit the app.
:server stop
The service can be also run without UI by running the following command on shell prompt.
joplin server start
Now I can use Web Clipper extension on FreeBSD!
Desktop Application
After successfully building the terminal app, I realized that Electron was added to FreeBSD ports tree as devel/electron4 last month. So finally, I tried to run the Electron-based desktop application on FreeBSD with it.
Because I’m not familiar with Electron at all, the following steps are just what I did to run the app and they might not be the right way. But I wrote them as a record anyway.
-
Configure pkg to use the latest package set.
2019-09-05
This step is no longer required. electron4 package has been available in “quarterly” for some time now.This change is required because the default “quarterly” set didn’t have devel/electron4 yet.
It was achieved by creating an overriding repository configuration file FreeBSD.conf in /usr/local/etc/pkg/repos and recreating the repository catalog as follows.sudo mkdir -p /usr/local/etc/pkg/repos echo 'FreeBSD: { url: "pkg+http://pkg.FreeBSD.org/${ABI}/latest" }' > /usr/local/etc/pkg/repos/FreeBSD.conf sudo pkg update -fI first tried to build devel/electron4 from port, but unfortunately my FreeBSD VM seemed to crash with the host (I was not there when the crash happened. I only saw the host OS had been restarted) at the late stage of hours of build process. So I decided to go with pre-built package in the latest package set.
-
Install electron4 package and its dependencies.
sudo pkg install electron4 -
Install Joplin’s dependencies.
pkgconf and vips are required for installing node-gyp.sudo pkg install node8 npm-node8 pkgconf vips sudo npm install -g node-gyp -
Get (clone) the source from GitHub and apply a patch.
cd ~/tmp/or/somewhere
git clone https://github.com/laurent22/joplin.git
To successfully build the Electron app, I had to make small modifications to at least two files.
They might be wrong ways but anyway here’s a patch to apply as follows.cd joplin patch < ~/tmp/patch-joplin-electron-freebsd.txt2019-09-05
Instead of manually applying the patch to the upstream source, my forked version can also be used as follows. (Sorry, but at your own risk)cd ~/tmp/or/somewhere git clone https://github.com/genneko/joplin.git cd joplin git checkout electron_freebsd‘electron_freebsd’ branch has the previously mentioned patch applied. ‘electron_freebsd_proxy’ also includes the patch in addition to the ‘proxy’ support patch.
-
Build the tools.
cd Tools npm install -
Build the Electron app by mostly following the build instruction.
I omitted a packaging part.cd ElectronClient/app rsync --delete -a ../../ReactNativeClient/lib/ lib/ npm install -
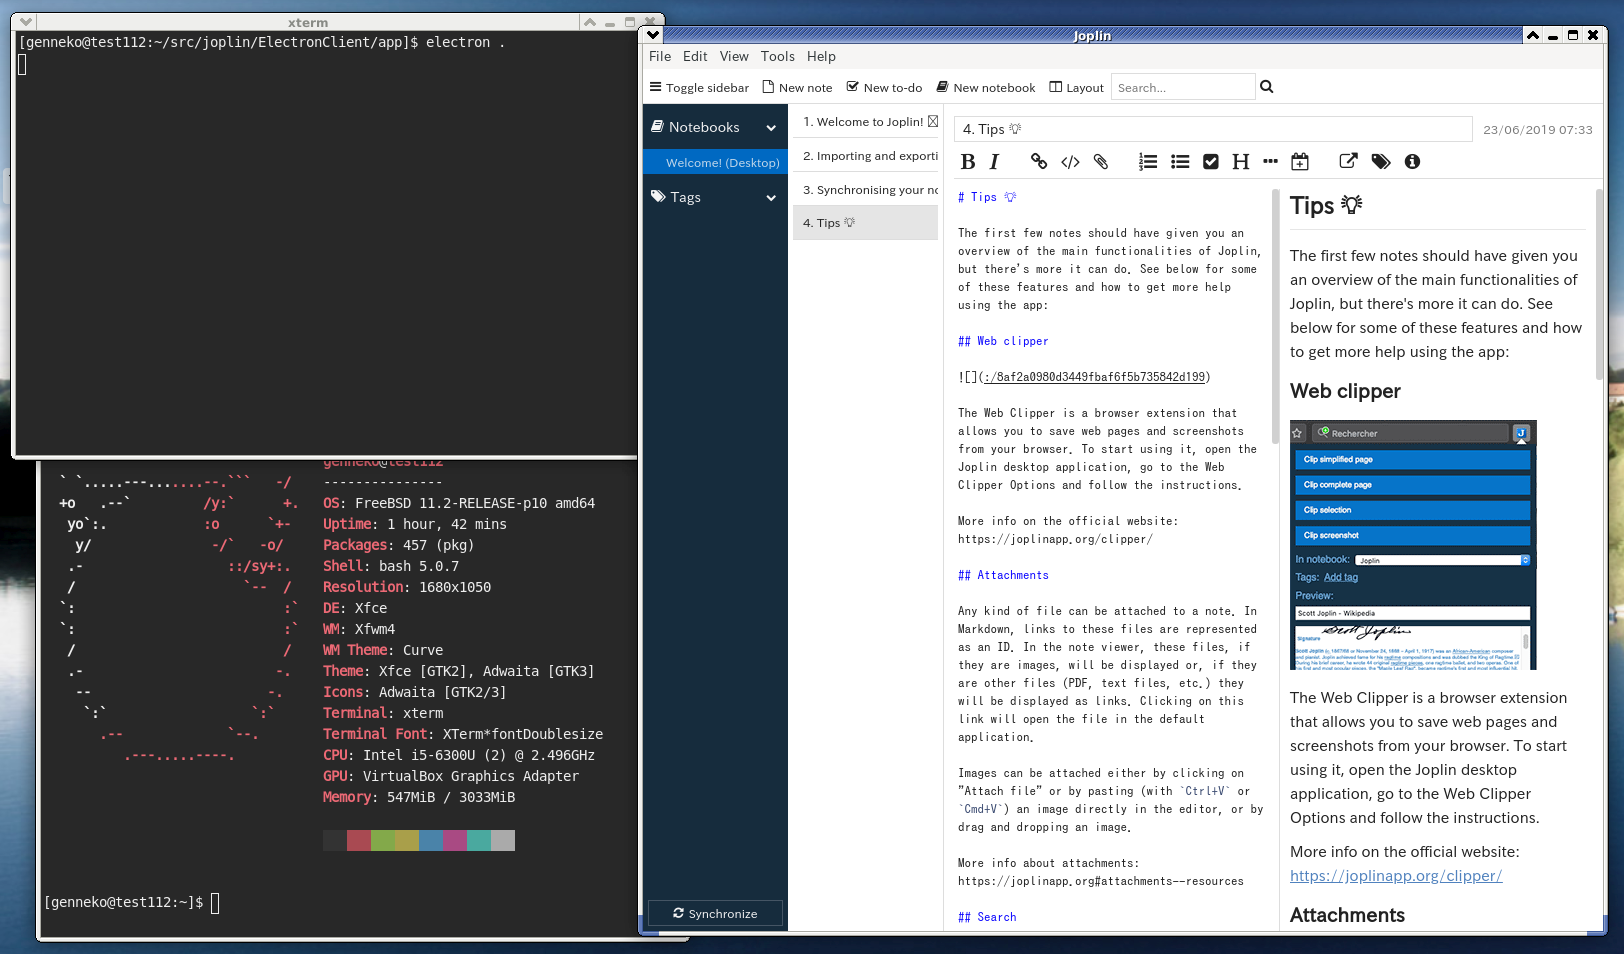
Run the desktop app.
electron . -
Yay! Many thanks to folks around the devel/electron4 port!
Joplin Web
Because I’ve been mainly using Evernote on its Web application, it is really nice to have a web UI for Joplin too.
Once again fortunately, there’s a nice third-party web frontend Joplin Web on GitHub. Although it looks like a WIP/experimental project, I gave it a try.
-
Install python36 and py36-sqlite3 packages.
sudo pkg install py36-sqlite3 -
Install Joplin Web by following the instructions on its webpage.
cd python3.6 -m venv .joplin-web cd .joplin-web/ source bin/activate git clone https://github.com/foxmask/joplin-web cd joplin-web/ pip install -r requirements.txt -
Edit a config file.
cp joplin_web/env.sample joplin_web/.env
vi joplin_web/.env
[joplin_web/.env]
...
JOPLIN_PATH='/home/genneko/.config/joplin/'
JOPLIN_PROFILE_PATH='/home/genneko/.config/joplin/'
JOPLIN_TOKEN='XXXXXXXXXXXXXXXXXXXXXXXXXXXXXXXXXXXXXXXXXXX'
API_USE_JOPLIN_WEBCLIPPER=True
I’m not 100% sure but the terminal app seems to store its database in $HOME/.config/joplin while the desktop app puts it in $HOME/.config/joplin-desktop.
JOPLIN_TOKEN is a kind of API key. I had been wondering where to get this for the terminal app for a while, then I found it in the app’s database file. It looks like its value can be retrieved by running the following query.
sqlite3 ~/.config/joplin/database.sqlite "select value from settings where key = 'api.token'" -
Prepare a database for Joplin Web.
This creates joplin_web.sqlite3 file in the current directory.python manage.py migrate -
Run the Joplin Web and point web browser to localhost:8001.
python manage.py runserver 8001 -
I can see and edit the Joplin notes on the web browser.
Its behavior is somewhat unstable because it’s apparently work in progress. But it’s definitely a great step toward the fully feathered web application!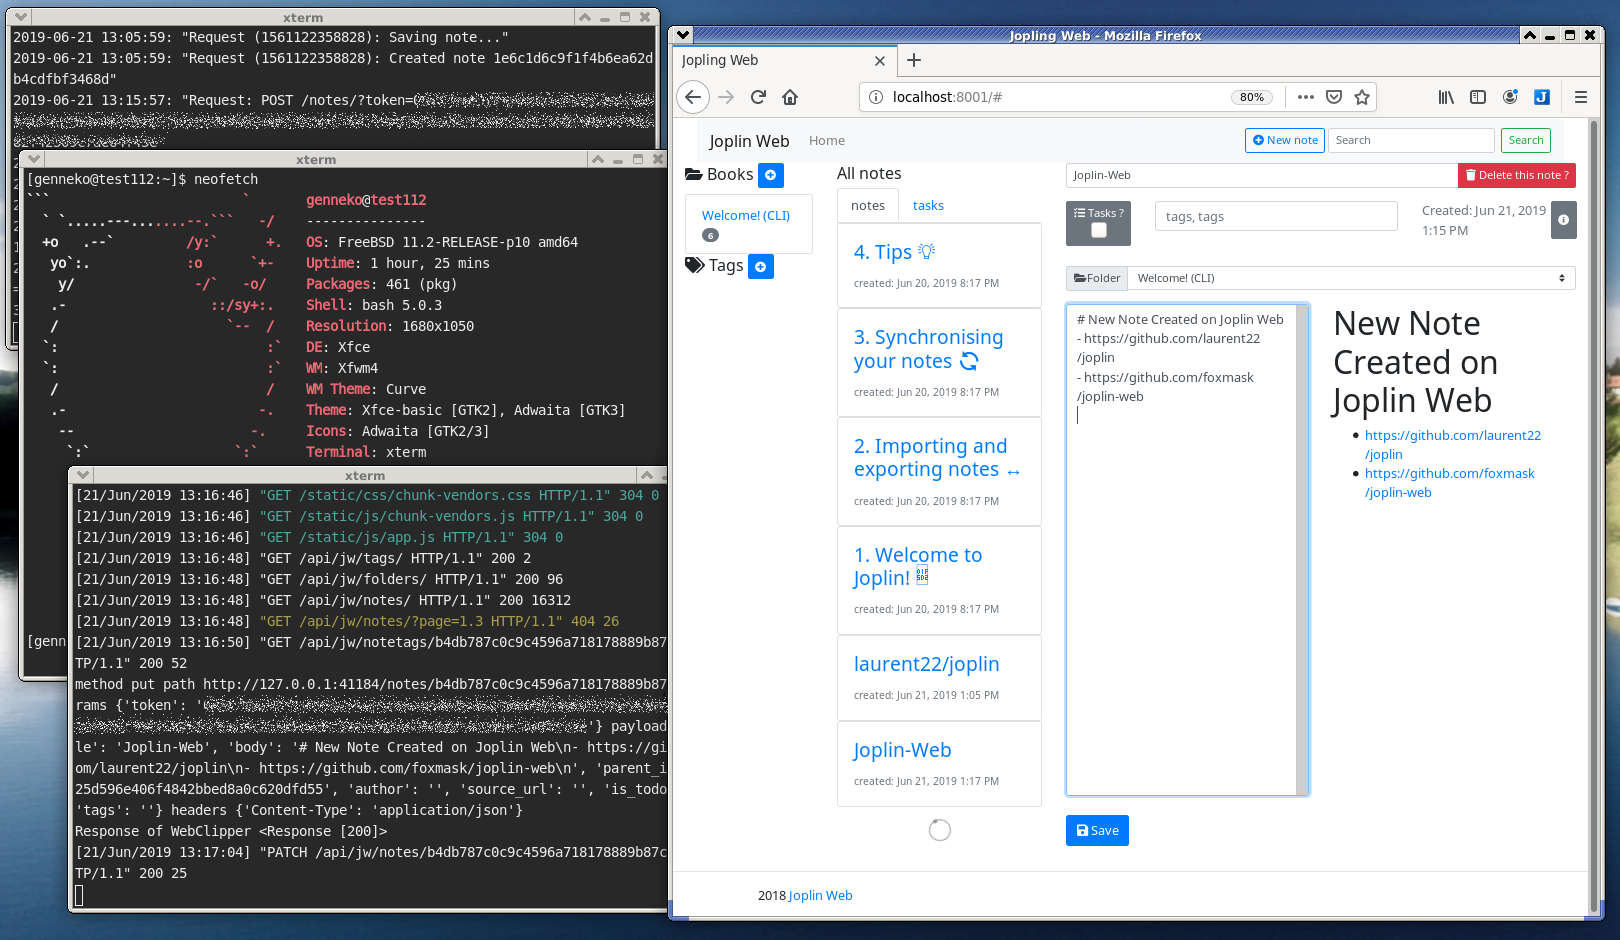
REST API and a Handy Perl Module
Joplin Web Clipper Service provides a clean and well-documented REST API.
For example, you can get a list of notebooks by using the following command line.
(jq is a powerful command-line JSON processor and can be installed from package)
curl -s http://localhost:41184/folders | jq
[
  {
    "id": "395a8d2573aa46849e67d06d69b9b692",
    "parent_id": "",
    "title": "NewBook",
    "type_": 2
  },
  {
    "id": "69a54d3a9b3541d291c75d429e707e02",
    "parent_id": "",
    "title": "Welcome! (CLI)",
    "type_": 2
  }
]
I first thought that I could possibly write yet another CLI client in /bin/sh but then I found that there’s a very handy perl module to access the API.
Here are the steps I took to install and get a feel of it.
-
Install dependencies.
sudo pkg install p5-JSON p5-libwww -
Get (clone) the source from GitHub.
git clone https://github.com/sciurius/perl-Joplin-API.git -
Build and install the module to ~/local/lib/perl5/site_perl.
cd perl-Joplin-API mkdir ~/local perl Makefile.PL PREFIX=~/local make make install -
Try to run the similar operation with perl. Great!
This makes me dream of writing a small web frontend with Mojolicious or some kind of automation scripts.cat | perl -Mlib=$HOME/local/lib/perl5/site_perl -MJoplin $j = Joplin->connect(server=>"http://localhost:41184", apikey=>""); $books = $j->find_folders(); for my $book (@$books){ printf("%s: %s\n", @$book{'title', 'id'}); } ^D NewBook: 395a8d2573aa46849e67d06d69b9b692 Welcome! (CLI): 69a54d3a9b3541d291c75d429e707e02
References
-
Joplin
https://joplinapp.org/ -
GitHub: laurent22/joplin
https://github.com/laurent22/joplin -
GitHub: foxmask/joplin-web
https://github.com/foxmask/joplin-web -
GitHub: sciurius/perl-Joplin-API
https://github.com/sciurius/perl-Joplin-API -
FreeBSD Forum: Electron for FreeBSD
https://forums.freebsd.org/threads/electron-for-freebsd.64103/ -
FreshPorts: devel/electron4
https://www.freshports.org/devel/electron4/
Revision History
- 2019-06-21: Created
- 2019-06-23: Added “Desktop Application” and changed the article title
- 2019-07-28: Corrected wrong paths for custom pkg config file
- 2019-09-05: Added notes on the latest status
(on the FreeBSD pkg repo “quarterly” and my forked joplin repo/branches including a patch to build desktop app on FreeBSD) - 2019-09-10: Updated a note on my fork.
(I’ve abandoned headless_proxy in favor of electron_freebsd_proxy branch because upstream/master now seems to include beta headless support.) - 2020-01-15: Added a “TL;DR” note.